As computing becomes more ubiquitous in our objects, designers need to be more aware of how to design meaningful interactions into electronically enhanced objects. At the University of Washington, a class of junior Interaction Design majors is exploring this question. These pages chronicle their efforts.

Tuesday, May 29, 2012

Aaron and Kelly: Chide Chair and Arduino Success!


Check in time! Over the last week or so, we've made immense progress on our chair that reminds you to take a break once in a while (and in the process, saves your health).

First and foremost, we've finished our arduino code that tells our chair how to behave when folks are sitting down, specifically after a certain point to start tipping forward, and then wait once the maximum tilt is reached, and then after our determined "break time" to move back into a comfortable sitting position.

Check it out here. (Side note: the time values are currently at 10 seconds to make testing easier for us. In real life, these delay values would be much longer.)

//Define the sensors
const int seat = 12;
const int fwdStop = 2;
const int revStop = 4;

//Define the motors
const int fwd = 7;
const int rev = 8;

//Define the stages in the process
int seatButton = 0;
int stopButton = 0;
int finishButton = 0;

//This activates the moter and keeps it on
boolean movingBackwards = false;
boolean movingForwards = false;

//seatButton "holding" stuff
int seatFirstTime = 1;
unsigned long seatStartTime;
unsigned long seatPressTime;

//stopButton "holding" stuff
int stopFirstTime = 1;
unsigned long stopStartTime;
unsigned long stopPressTime;

//===============================================

void setup() {

//Set pin modes
pinMode(seat, INPUT);
pinMode(fwdStop, INPUT);
pinMode(revStop, INPUT);
pinMode(fwd, OUTPUT);
pinMode(rev, OUTPUT);
Serial.begin(9600);

}

//===============================================

void loop(){

seatButton = digitalRead(seat);
stopButton = digitalRead(fwdStop);
finishButton = digitalRead(revStop);

/*
stopButton and finishButton: LOW == IN and HIGH == OUT
seatButton: HIGH == IN and LOW == OUT
*/
//Start and waiting process
if (movingForwards){
motorOnFwd();
} else {
motorOff();
}
//seatButton IN, finishButton IN
if (seatButton == HIGH && finishButton == LOW) {
if (seatFirstTime == 1) {
seatStartTime = millis();
seatFirstTime = 0;
}
seatPressTime = millis() - seatStartTime;
if (seatPressTime >= 1) {
}
seatPressTime = millis() - seatStartTime;
if(seatPressTime >= 1){
Serial.print("Time: ");
Serial.print(seatPressTime);
Serial.print(" milliseconds ");
Serial.print(int(seatPressTime/1000));
Serial.println(" seconds");
}
if (seatPressTime > 10000) {
movingForwards = true;
}
} else if (seatFirstTime == 0) {
seatFirstTime = 1;
movingForwards = true;
}

//Forward and stop process
//Wait and reverse process
if (movingBackwards){
motorOnRev();
} else {
motorOff();
}
//stopButton IN
if (seatButton == LOW && stopButton == LOW && finishButton == HIGH || stopButton == LOW) {
if (stopFirstTime == 1) {
stopStartTime = millis();
stopFirstTime = 0;
}
stopPressTime = millis() - stopStartTime;
if (stopPressTime >= 1) {
}
stopPressTime = millis() - stopStartTime;
if(stopPressTime >= 1){
Serial.print("Time: ");
Serial.print(stopPressTime);
Serial.print(" milliseconds ");
Serial.print(int(stopPressTime/1000));
Serial.println(" seconds");
}
if (stopPressTime > 10000) {
movingBackwards = true;
}
} else if (stopFirstTime == 0) {
stopFirstTime = 1;
movingBackwards = true;
}

/*
} else if (seatButton == LOW && stopButton == LOW) {
movingBackwards = true;
}
*/

/* IMPORTANT! DO NOT DELETE THIS SECTION
seatButton and finishButton act as killswitches so
the motor and battery does not commit suicide */
if (seatButton == HIGH && movingBackwards == true || finishButton == LOW) {
movingBackwards = false;
}

if (stopButton == LOW) {
movingForwards = false;
}
/* End of important section */

}

//===============================================

void motorOff() {
digitalWrite(fwd, HIGH);
digitalWrite(rev, HIGH);
}
void motorOnFwd() {
digitalWrite(fwd, LOW);
digitalWrite(rev, HIGH);
}
void motorOnRev() {
digitalWrite(fwd, HIGH);
digitalWrite(rev, LOW);
}

Now that our code is good to go, we've been working on the mechanical aspects of our chair: disassembling it, removing unneeded levers, and putting the chair back together. Currently we're attaching the motor and starting to manufacture the arm that will eventually tip the seat and backrest forward. Progress below!


Friday, May 25, 2012

Shelby and Bridget, Progress Report

Just a quick progress report on our project, that involves tattletale-ing on line cutters via Twitter.

We've been playing with the code a bit more, as well as making a little progress with setting up the hardware. Thanks to the good folks at Metrix Create:Space, we realized that the way we had decided to set up our hardware was a little ridiculous. We were going to use a LED driver to make a 7-segment display, but Richard of MC:_ informed us that 7-segment drivers exist and do the work for you! Awesome! We will be using SN7447s, and we are in the process of figuring out how to wire everything.

We simplified, then modified our code to be able to count the number of tweets that are received, once the appropriate processing sketch is running. The LED in pin 13 blinks the number of tweets received; e.g., for 5 tweets received, it blinks 5 times. Here is the Arduino code for counting the number of tweets (used in conjunction with the processing sketch in the last post we made):

 void listenToSerial()
{
  int serialMsg = 0;
  if (Serial.available())
  {
    serialMsg = Serial.read();
    if (serialMsg == 1)
    {
      tweetCount++;
      for (int g=0; g<tweetCount; g++)
      {
      digitalWrite (LED13, HIGH); //LED in pin 13 blinks the number of tweets received
      delay (500);
      digitalWrite (LED13, LOW);
      delay (500);
      }
    }
  }
  else
  {
      digitalWrite (LED13, HIGH); //in the normal state (no tweets received),
                                                        // LED in pin 13 stays lighted
      delay (3000);
  }
}

Our next step (code-wise) will be to figure out how to use this code with the SN7447 drivers to create numbers. Once we have it wired, I think it will be a matter of setting the correct Arduino pins HIGH or LOW. From what we understand from the SN7447 datasheet found here, there are 4 inputs (A, B, C, and D, or specifically on the SN7447: pins 7, 1, 2, and 6), for which we use binary code to control the a-g outputs of the 7-segment display. We'll try out a few more things and keep you posted on our progress!


EDIT:
Got it to work!

We used the setup from this schematic diagram, and connected everything appropriately. We then used a slight variation on the code from this post, to test whether the setup was working properly.  Took a few tries (tweaks in the code, changes in the wiring) to get the numbers to count up correctly. We then combined the code shown above with the code from the forum post to link the counting code with the twitter-interactive code. It took a while to figure it all out, but in the end, the code is actually pretty simple:

int seven_seg_digits[10][4] = {  { 0,0,0,0 },  // = 0
                                 { 0,0,0,1 },  // = 1
                                 { 0,0,1,0 },  // = 2
                                 { 0,0,1,1 },  // = 3
                                 { 0,1,0,0 },  // = 4
                                 { 0,1,0,1 },  // = 5
                                 { 0,1,1,0 },  // = 6
                                 { 0,1,1,1 },  // = 7
                                 { 1,0,0,0 },  // = 8
                                 { 1,0,0,1 }   // = 9
                               };
int tweetCount = 0;

void setup()
{
  Serial.begin(9600);
  pinMode(6, OUTPUT);
  pinMode(7, OUTPUT);
  pinMode(8, OUTPUT);
  pinMode(9, OUTPUT);
  pinMode(10, OUTPUT);
  pinMode(11, OUTPUT);
  pinMode(12, OUTPUT);
  pinMode(13, OUTPUT);
}

void loop()
{
  listenToSerial();
}

void listenToSerial()
{
  int serialMsg = 0;
  if (Serial.available())
  {
    serialMsg = Serial.read();
    if (serialMsg == 1)
    {
      Display();
    }
  }
}

void Display()
{
  tweetCount++;
  int ones = 0;
  int tens = 0;
  ones = tweetCount % 10;
  tens = tweetCount / 10;
  int pinOnes = 6;
  for (int disp1 = 0; disp1 < 4; disp1++)
  {
    digitalWrite(pinOnes, seven_seg_digits[ones][disp1]);
    ++ pinOnes;
  }
  int pinTens = 10;
  for (int disp10 = 0; disp10 < 4; disp10++)
  {
    digitalWrite(pinTens, seven_seg_digits[tens][disp10]);
    ++ pinTens;
  }
}


Here's a photo of the setup:

Here's a photo of it working! It is displaying the number '11', for 11 tweets received while the processing sketch was running. It doesn't yet look like it, because the output pins of the 7447 are oriented as f-g-a-b-c-d-e, and the segments are set up in this configuration. Therefore, the b and c segments of both the tens and ones (place value) are lit up to represent the number 11.


With the code working, mainly all that's left to do is to make the actual LED number display board by soldering bunch of of LEDs and resistors together (in the groupings of the a-g segments).

Thursday, May 24, 2012

Reema & Jill: Coffee Cup_formal analysis

 Everyone knows you cant fit a square peg in a round hole. Meet our coffee cup. Housing a squared Arduino around a round cup, creates many formal problems. We seem to have settled on a formal plan, though. We will have a plastic coffee cozy wrapped in copper foil for the touch capacitor. The Arduino and breadboard will be housed on one side, and the thermistor will extend into the cup and clip inside the lip. The entire form will be wrapped in fabric to conceal the parts. Over the next couple of days we will begin construction.


Aaron and Kelly: Working on Arduino

So we've been working hard at our coding for a while now, with mixed success. Our physical wiring and Arduino setup appears to be sound, with each switch and relay working when tested with simple code.

However, connecting everything to work in tandem the way we hope is not going quite as smoothly. Here is our code to date.


//Define the sensors
const int seat = 12;
const int fwdStop = 2;
const int revStop = 4;

//Interrupt sensor
int shiftStageTwo = 0;

//Define the motors
const int fwd = 7;
const int rev = 8;

//Define the stages in the process
int stageOne = 0;
int stageTwo = 0;
int stageThree = 0;

//Interrupt stuff
volatile int shiftStagetwo = fwdStop;

void setup() {
//Set pin modes
pinMode(seat, INPUT);
pinMode(fwdStop, INPUT);
pinMode(revStop, INPUT);
pinMode(fwd, OUTPUT);
pinMode(rev, OUTPUT);
//Set interrupts
attachInterrupt(stageTwo, swap, LOW);
}

//Interrupt function
void swap() {
if (shiftStagetwo == fwdStop) {
digitalWrite(fwd, HIGH);
digitalWrite(rev, HIGH);
}
else {
digitalWrite(fwd, HIGH);
digitalWrite(rev, HIGH);
}
}

void loop(){
stageOne = digitalRead(seat);
stageTwo = digitalRead(fwdStop);
stageThree = digitalRead(revStop);
if (stageOne == HIGH) {
//delay(5000); //delays don't work if multiple delays are present
digitalWrite(fwd, LOW);
digitalWrite(rev, HIGH);
}
else {
digitalWrite(fwd, HIGH);
digitalWrite(rev, HIGH);
}
if (stageTwo == LOW) {
digitalWrite(fwd, HIGH);
digitalWrite(rev, LOW);
}
else {
digitalWrite(fwd, HIGH);
digitalWrite(rev, HIGH);
}

// if (stageThree == LOW) {
// delay(5000);
// digitalWrite(fwd, HIGH);
// digitalWrite(rev, LOW);
// detachInterrupt(stageTwo);
// }
// else {
// digitalWrite(fwd, HIGH);
// digitalWrite(rev, HIGH);
// }
}

The interrupt function has effectively let us switch between motors, but things are still not quite up to par. Dominic's recommendation is to simplify our code and reduce most of our methods to if and while loops. That's next on our plate!

Wednesday, May 23, 2012

Claire & Sheema: Construction of our Bed

We are moving right along on to the construction of our bed frame that a mattress will sit on top of. We are trying to build a frame that a vinyl tube sits between and will inflate like a jack, raising one side of the bed so the person will roll out once their alarm clock goes off and triggers a pump. 

So here are our materials: 

2 sheets of plywood, a vinyl waterbed tube, a hose, hose adapter valve pieces, 1"by 2" and 2" by 2" wood pieces as spacers for the top sheet of plywood to rest on, and hinges to connect one side of the 2 plywood sheets.


Step one was to screw our wooden 1"by 2" and 2"by 2" spacers into the bottom sheet of plywood.


Step two was to screw our wooden 1"by 2" and 2"by 2" spacers into the bottom sheet of plywood.


Step three was to cut out handles in the bottom plywood sheet so that we could more easily move our bed frame. Little did we know it was much harder to move than we imagined, even with the handles!


Below our finished bed frame! We are checking to see it everything is a set and working.


This is the air compressor we were planning on using to inflate our tube, but we realized that even once the relay is triggered and power runs to the compressor, it still needs to be programmed to the correct psi each time. Thus we are going revert back to our initial idea, which was to use a plain old air mattress pump!


Friday, May 18, 2012

Reema & Jill: Coffee Cup Progress_thermistor

This week, we wanted to work on our coffee cup holder being able to read the temperature of the beverage inside the cup. This changed from our original idea (in which the temperature sensor was on the outside of the cup), to be more accurate with the sensor reading the actual liquid temperature. We hooked up our thermistor and wires to our arduino, and then placed it into the top of our beverage cup (without touching the drink). After altering some code we found online and on the arduino.cc website, we got the code to work and used the serial port to read the temperature. The room temperature was around 21 degrees Celsius and our hot cocoa was around 26 degrees Celsius when we tested it (which was cooled a bit from the original temperature). See our process images and code below.


code:


// File: ThermistorTemperature.pde


void setup() {

Serial.begin(9600); // open serial port and set data rate to 9600 bps

Serial.println("Thermistor temperature measurement:");

Serial.println("\n Vo Rt T (C)");

}

// -- loop() is repeated indefinitely

void loop() {

int ThermistorPin = 1; // Analog input pin for thermistor voltage

int Vo; // Integer value of voltage reading

float R = 9870.0; // Fixed resistance in the voltage divider

float logRt,Rt,T;

float c1 = 1.009249522e-03, c2 = 2.378405444e-04, c3 = 2.019202697e-07;

Vo = analogRead(ThermistorPin);

Rt = R*( 1023.0 / (float)Vo - 1.0 );

logRt = log(Rt);

T = ( 1.0 / (c1 + c2*logRt + c3*logRt*logRt*logRt ) ) - 273.15;

Serial.print(" "); Serial.print(Vo);

Serial.print(" "); Serial.print(Rt);

Serial.print(" "); Serial.println(T);

delay(200);

}


Thursday, May 17, 2012

Sheema & Claire: Functioning Electronics

After getting all the materials and electronic pieces we need, it was time to put put our arduino to use. But, in order to get it working we needed to solder. Soldering was something neither Claire nor I had ever done, and when we walked into Metrix on Wednesday night, we looked like terrified students unsure of what we were doing. We need to solder the microphone switch to the arduino board, and the relay and relay components to the relay board.

Learning how to solder.
Learning to solder was a valuable experience. Walking into the tiny solder room at metrix we were introduced to the tools, shown a demonstration, and then left to finish the job ourselves. At first we were both hesitant, not wanting to damage the relay or arduino, but after a couple of tries it got easier to know when to stop heating and applying solder, and what the best angles were to get the best results.

We stripped wires to solder them to a the relay board.
After we finished soldering the relay board at Metrix we tested it out to make sure that it still worked and nothing was wrong with the relay (the test passed).

After getting the okay on our relay we set out to test it with our arduino and pump to make sure it all worked. We built a box for our relay board to keep ourselves and our relay safe.

Relay, relay box, arduino, breadboard, pump all connected to test our design.
We were super excited at our set up and soldering job, but sadly we connected to arduino to power and nothing... we tried again, and again, and still nothing. Then came the daunting task of testing all the circuits to see what the problem could be. One by one we test different components of both boards, until finally the only thing left was the relay. Then it was official, the relay was bad. Apparently it is common for relays to be defective, but it was till dissapointing. All the time and energy we put into soldering the relay and now we were faced with this problem. Then the solder sucking began.
Examining our relay board.

Solder sucking.
The tool I am holding in the image above is a solder sucker, a nifty little tool that when placed just right sucks the solder right off the board, allowing us to disconnect the relay. Using the solder sucker was a two person job, one person to heat up the solder and the other to use the solder sucker on top of it really fast before it dried to get the solder off. 

In the end we managed to get all the solder off the relay, and then began soldering a new relay onto the relay board. Once we were done soldering on the new relay we attached all the components together again and tested them, luckily it was a success and the pump turned on!! It was a long process of debugging, but we eventually got to the outcome we had been hoping for, and learned a lot along the way.


Robin & Carly's progress of the shaming bathroom

So we have been experimenting with the different components to our project with speakers and laser sensors and timers.


Last week we were able to figure out how to process the light sensor to detect when the light was broken and then would turn on and off the LED light.  This was the first step to figuring out how to determine if someone was entering the bathroom.  We messed with the numbers and were able to figure out how to change them within the processing to change it depending on the lighting in each room.

void setup() {
pinMode(4, OUTPUT);
pinMode(13, OUTPUT);
}

void loop (){
digitalWrite(4, HIGH);
if(analogRead(0) < 500){
digitalWrite(13, HIGH);
} else{
digitalWrite(13, LOW);
}
}


After this we then experimented with the speaker in which we would be having connected to the arduino in order to make the shameful sound that will shame the unsanitary person who tries to run out of the bathroom without washing there hands. We have been able to connect the speaker to make it work out next step is to create the tune or have it speak. Here it is connected to the light sensor, so whenever the laser beam is broken the noise goes off.


Our next step was to create a beam that was timed after its beam had been broken. This would be in the case that someone exits the bathroom and instead of washing their hands walks through the exit breaking the laser beam which would activate the shame sound automatically. We had to change some of the numbers to be able to figure out timing and light sensitivity correctly but we got it to work!


long startTime;
long elapsedTime;

boolean start =false;

void setup() {
pinMode(4, OUTPUT);
pinMode(12, OUTPUT);
pinMode(13, OUTPUT);

}

void loop() {
digitalWrite(4, HIGH);
digitalWrite(12, LOW);
if(analogRead(0) < 500) {
digitalWrite(13, HIGH);
if(!start) {
start = true;
}else{
elapsedTime = millis() - startTime;
if(elapsedTime < 3000) {
digitalWrite(12, HIGH);
start = false;
delay(100);

} else{
digitalWrite(12, LOW);
start = false;
delay(100);

}
startTime = 0;
elapsedTime = 0;
}
delay(100);
}else{
digitalWrite(13, LOW);
digitalWrite(12, LOW);
if(start){
startTime = millis();
delay(100);


}

}
}


Now we have to start putting things together as one and experimenting with the system as a whole and the problems I am sure we will run into.


Aaron and Kelly: Chair Progress

We are still hard at work trying to make our responsive chair! Sitting too long is, as recent studies have shown, We intend to create a chair that will time how long a person has been sitting, and tilt them forward after they've been sitting too long to encourage a well-deserved stretch break.

We've made some good progress on this front in the last week! Recently we disassembled our chair and then reassembled it without most of the springs, so now the back and seat can move without depressing the levers under the seat. Quick demo video:
Now that we have it freely moving, we can connect up our motor and Arduino onto the chair directly. Next step is figuring out how to best arrange the setup, and get our extremely confusing arduino four-way relay working.

We also experimented with our motor itself, to see just how much power we'll have and if the chair will be able to move at any relatively fast speed. Based on this, I don't think we need to worry.
Video

We've been experimenting with the Arduino Metro timer library, and will be using this library to handle our timed actions as we move forward into the programming portion of our project.

Wednesday, May 16, 2012

Miles and Kim: Toothbrush Progress

We are very excited about the progress we made in getting the toothbrush to pull up a youtube video. When the toothbrush is removed from the container it pulls up a youtube video by parsing for a url within an xml file. Here is a video of it in action:


Here are some photos of the mechanism inside of the toothbrush container:


Tuesday, May 15, 2012

Reema & Jill: Foil Capacitor Touch Sensor


Burning your mouth on hot coffee is no fun! We intend our project to sense the temperature of the coffee and, when touched, output colored LEDs to indicate if it's too hot, cold or just right. In order to achieve the touch input, we set up a foil capacitor touch sensor. A simple piece of foil will do, plus three wires, an LED, resistors and the Arduino. Our sketch reads the spike in current change from the "drinker's" touch and turns on the LED. See example and sketch below: 

#include <CapSense.h>

/*
* Reema and Jill: Foil Me Thirsty
* Adapted from CapitiveSense Library Demo Sketch by Paul Badger 2008
* Uses a high value resistor e.g. 10 megohm between send pin and receive pin
* Resistor effects sensitivity, experiment with values, 50 kilohm - 50 megohm. Larger resistor values yield larger sensor values.
* Receive pin is the sensor pin - try different amounts of foil/metal on this pin
* Best results are obtained if sensor foil and wire is covered with an insulator such as paper or plastic sheet
*/


CapSense cs_4_2 = CapSense(4,2); // 10 megohm resistor between pins 4 & 2, pin 2 is sensor pin, add wire, foil


void setup() 
{
cs_4_2.set_CS_AutocaL_Millis(0xFFFFFFFF); // turn off autocalibrate on channel 1 - just as an example
Serial.begin(9600);
pinMode(13, OUTPUT);

}

void loop() 
{
//digitalWrite(13,HIGH); //LED on
//delay(50);
//digitalWrite(13,LOW);
long start = millis();
long total1 = cs_4_2.capSense(30);
if (total1 > 100) {
digitalWrite(13,HIGH); //LED on
else {
digitalWrite(13,LOW);

Serial.print(total1); // print sensor output 1
Serial.print("\t");
Serial.println();

delay(100); // arbitrary delay to limit data to serial port 
}

Shelby/Bridget vs. Cutting in Line

Team Bridget/Shelby reporting!

Just as an update: when we last posted, we decided we wanted to create a social reproach for line-cutters. We planned to do so by embarrassing the line-cutter in some way, or to take a photo of them so that they wouldn’t be able to receive service when they reached the front of the line. Due to difficulty in pinpointing exactly who it is that has cut in line, we have since decided to take a different point of view: we will instead collect and display data about line cutting. We originally thought that we would sense the situation of line-cutting using sensors, but it would be difficult to get the sensors to actually recognize line-cutting, since the situation is a social one. In addition, we realized that a large number of very accurate multi-purpose sensors already exist within a line: people. People with smart phones. Tablets. Computers. Devices of all sorts, shapes, and sizes! We therefore decided to use Twitter to allow people to communicate that they had been cut in line. Through some research, we found some projects that others had already done that allowed them to communicate through Twitter to their Arduino, which then did something cool. This instructable made the process seem fairly straightforward, so we decided to adapt the process to our own project, using python to communicate between Twitter and the Arduino. Last Thursday, we decided to try to get our Arduino to blink an LED when @cut_in_line was mentioned.

We made a fair amount of progress this past weekend with this goal. We tried playing with the Python-Twitter library, as was our original plan, but upon further reflection realized that THIS WAS A VERY BAD IDEA, since we were not yet familiar with the… peculiarities of Python (though we did finally manage to figure out how to even install and import the Python-Twitter library and its dependencies… this is beside the point, but I thought I’d share). We discovered that it is possible to do the very same thing with Processing, and fortunately, we are already familiar with Processing!

We found this instructable, which proved to be very useful. We first downloaded the contributed libraries twitter4j and Arduino-Processing for Processing. Installing these libraries was somehow really confusing, due to conflicting documentation, and took much longer than it should have, but in the end, we found that this was the correct way to do it. We created a Twitter account, and registered it as an application. We then adapted the Processing code in the instructable to fit our own needs for this project. The code is as follows:

 import processing.serial.*;

import twitter4j.conf.*;
import twitter4j.internal.async.*;
import twitter4j.internal.org.json.*;
import twitter4j.internal.logging.*;
import twitter4j.json.*;
import twitter4j.internal.util.*;
import twitter4j.management.*;
import twitter4j.auth.*;
import twitter4j.api.*;
import twitter4j.util.*;
import twitter4j.internal.http.*;
import twitter4j.*;
import twitter4j.internal.json.*;

static String OAuthConsumerKey = "UiOEemSn7dB28nWFLJ78ng";
static String OAuthConsumerSecret = "jXAtBALSUU0zVZkt7HADmmxloCQfTXg2WJkqVsFxA";
static String AccessToken = "578379050-gl83Yc6JZ4d1XpDephnsRNkUOor3e0vdo7jBvdTl";
static String AccessTokenSecret = "G0NtjBx2qkqggHC4sLYigIk27RhKMXEyyLLqoeILjNE";

Serial arduino;
Twitter twitter = new TwitterFactory().getInstance();

String oldID = "";

void setup() {
size(125, 125);
frameRate(10);
background(0);
println(Serial.list());
String arduinoPort = Serial.list()[0];
arduino = new Serial(this, arduinoPort, 9600);
loginTwitter();
}

void loginTwitter() {
twitter.setOAuthConsumer(OAuthConsumerKey, OAuthConsumerSecret);
AccessToken accessToken = loadAccessToken();
twitter.setOAuthAccessToken(accessToken);
}

private static AccessToken loadAccessToken() {
return new AccessToken(AccessToken, AccessTokenSecret);
}

void draw() {
background(0);
text("@cut_in_line", 35, 65);
getMention();
delay(15000); // wait 15 seconds to avoid Twitter Rate Limit
}


void getMention() {
List mentions = null;
try {
mentions = twitter.getMentions();
}
catch(TwitterException e) {
println("Exception: " + e + "; statusCode: " + e.getStatusCode());
}
Status status = (Status)mentions.get(0);
String newID = str(status.getId());
if (oldID.equals(newID) == false){
oldID = newID;
println(status.getText()+", by @"+status.getUser().getScreenName());
arduino.write(1); // arduino gets 1
}
}


We then adapted the Arduino code in the same instructable to fit our needs, which were much simpler than in the instructable. This is the code:

 String state = "normal";
const int LED = 13;

void setup() {
  Serial.begin(9600);
  pinMode(LED, OUTPUT);
}

void loop() {
  listenToSerial();
  setState(state);
}

void setState(String s) {
  if (s == "normal") normal();
  if (s == "mention") mention();
}

void listenToSerial() {
  int serialMsg = 0;
  if (Serial.available()) {
    serialMsg = Serial.read();
    if (serialMsg == 1) state = "mention"; 
  }
  else {
    normal();
  }
}

void normal() {
  state = "normal";
  if (state == "normal") {
    digitalWrite(LED, LOW);
  }
  else {
    mention();
  }
}

void mention() {
  state = "mention";
  if (state == "mention") {
    digitalWrite (LED, HIGH);
    delay (500);
    digitalWrite (LED, LOW);
    delay (500);
    digitalWrite (LED, HIGH);
    delay (500);
    digitalWrite (LED, LOW);
    delay (500);
    digitalWrite (LED, HIGH);
    delay (500);
    digitalWrite (LED, LOW);
    delay (500);
  }
}


We uploaded the code to the Arduino and plugged a LED into the 13 and ground pins. Then we convinced someone to mention @cut_in_line in a tweet (thanks Kelly!). When we run the Processing sketch, the LED blinks 3 times and then returns to the normal state.

Next, in terms of code, is probably to figure out how to make the output react appropriately for multiple tweets. So far, we have only gotten one person to spam their Twitter updates and mention @cut_in_line, so we're not quite sure what will happen when there are two "mentions" (will the output be the same, or will it happen twice?). We will also be attempting to figure out is whether our LED will blink when it notices a new "mention," because currently the LED blinks and returns to its normal state when we run the Processing sketch (as a result of our existing "mention"), but whether it will do this in real time, we are not yet sure. Also, we would like to explore whether it is possible for a person to tweet @cut_in_line and a number, to report that they had been cut in line by multiple people. We're working on making a LED number board that will eventually display the number of people who cut in line. We will be soldering and appropriately wiring LEDs and resistors to a perfboard.


COOL!

Charissa + Erin: Shelves!

Visit here for our latest movie clip of our smarty cubbies.

The development of our clutter reducing cubbies is progressing as we continue to tackle each Arduino function of our shelving unit. At this stage, the FSR pressure sensor effectively detects when an object is placed on its surface and also recognizes when the object is removed. We currently have a working timer that can begin counting down when an object is removed from the surface; when an item isn't summarily returned, the Arduino signals a missing item by illuminating a small LED. When the item is replaced, the LED lights turn off. We're also getting the sound portion of our shelves to work. The larger obstacle with the inclusion of audio signals is the content: what will the MP3 board instruct the user to do? We don't want something that comes across as being nagging. We would like to hear everyone's opinion on the matter at our next critique.

We're looking ahead and we're trying to decide on overall aesthetic of our shelving unit. We need to think about colors, drawer material, and the items inside the cubbies for the movie. We'd also like to include a calibration button somewhere on the shelves. f


Friday, May 11, 2012

Reema & Jill: Coffee Cup Progress_speaker prototype


What if your coffee cup to tell you whether it was too hot or not? Would that save you from a few tongue burns? We considered voice output to indicate the temperature. We started by recording audio and down sampling it into a format readable that the Arduino can read. Once our speakers arrived in the mail, Yay delivery!! We first set up our sketch to play two different phrases, which we originally tried playing from different speakers. We realized that after altering the code we could play both through one speaker using a delay to separate the sounds. 


Thursday, May 10, 2012

Charissa + Erin: Shelving and FSR Sensors

Well, we got the FSR pressure sensor to work. It appears as though all systems are a go in terms of eliminating our cluttered spaces and minds, which is great considering my room is pretty awful right now and I wouldn't mind imposing my disorder on technology to resolve.We've completed a simple sketch for the FSR sensor: the LED light illuminates for the duration of which pressure is applied to the sensor. It's beyond cool. I'd say borderline mind blowing. (No, seriously, this was a big day for Erin: she finally completed a sketch that....worked.... disregard the fact that Charissa set everything up and all Erin had to do was plug in the sketch, connect one thing, and write on the blog).

You watch video now, here:


Things coming up and you should look forward to:

The purchase of a second hand cubby/shelving space. Yep, we're searching the greater Seattle area for some quality shelving that we can dismember in the name of design!

Some MP3 jingles, to politely remind you to get your act together through song.

I feel that just about covers it!!


Oh wait, here's some code:


/* FSR simple testing sketch.

Connect one end of FSR to power, the other end to pin 2.
Then connect one end of a 0.1uF capacitor from pin 2 to ground

For more information see www.ladyada.net/learn/sensors/fsr.html */

int fsrPin = 2;     // the FSR and cap are connected to pin2
int fsrReading;     // the digital reading
int ledPin = 13;    // you can just use the 'built in' LED

void setup(void) {
  // We'll send debugging information via the Serial monitor
  Serial.begin(9600);  
  pinMode(ledPin, OUTPUT);  // have an LED for output
}

void loop(void) {
  // read the resistor using the RCtime technique
  fsrReading = RCtime(fsrPin);

  if (fsrReading == 30000) {
    // if we got 30000 that means we 'timed out'
    Serial.println("Nothing connected!");
  } else {
    Serial.print("RCtime reading = ");
    Serial.println(fsrReading);     // the raw analog reading

    // Do a little processing to keep the LED blinking
    fsrReading /= 10;
    // The more you press, the faster it blinks!
    digitalWrite(ledPin, HIGH);
    delay(fsrReading);
    digitalWrite(ledPin, LOW);
    delay(fsrReading);
  }
  delay(100);
}

// Uses a digital pin to measure a resistor (like an FSR or photocell!)
// We do this by having the resistor feed current into a capacitor and
// counting how long it takes to get to Vcc/2 (for most arduinos, thats 2.5V)
int RCtime(int RCpin) {
 int reading = 0;  // start with 0

  // set the pin to an output and pull to LOW (ground)
  pinMode(RCpin, OUTPUT);
  digitalWrite(RCpin, LOW);

  // Now set the pin to an input and...
  pinMode(RCpin, INPUT);
  while (digitalRead(RCpin) == LOW) { // count how long it takes to rise up to HIGH
    reading++;      // increment to keep track of time

    if (reading == 30000) {
      // if we got this far, the resistance is so high
      // its likely that nothing is connected!
      break;           // leave the loop
    }
  }
  // OK either we maxed out at 30000 or hopefully got a reading, return the count

  return reading;
}


That should probably cover it now....

Tuesday, May 8, 2012

Claire & Sheema: Materials and Sensors


Audience:  “Snoozers” who can’t help but hit the snooze button continuously.
Concept: Our concept direction as of now is to help “snoozers” get up and out of bed. We know that forcing someone out of bed could result in annoyed and frustrated users; our design slowly gets people up with the assistance of a deflating mattress ramp that will role him or her out of bed. In order to achieve this we were planning on placing a sequence of blown up tubes in increasing size order into a foam piece on top of the mattress.
Materials: Our first step was the exploration of materials to create this “ramp.” While brainstorming we thought of “cheer tubes.” Most people know of “cheer tubes” from football games or birthday parties. We took a trip to a party store to see how exactly these tubes are bound together and what material they are made of. From this exploration we were interested in using a nylon or vinyl material that would expand when pumped with air. We then decided to take a trip to Joanne’s to explore the materials we could use. While there we would found clear vinyl, which came in different thicknesses, presenting us with the perfect opportunity to decide which was best for our needs.
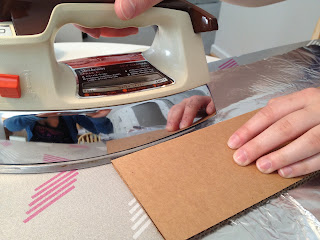
After taking the vinyl home we decided to try and experiment with ways to bind the edges like the “cheer tubes” (and balloons) we saw in the stores. With an ordinary iron we laid two pieces of clear vinyl on top of each other, placed a piece of cardboard as a straight ruler and ironed the edges. After experimenting with multiple pressures, amount of heat, and the time needed to seal the material, we were able to bind the four sides of our tube, leaving a little hole where we could stick the pump in and inflate the tube. 


After creating our first relatively successful tube, we proceeded to create a diagram of how we could bind and inflate/deflate multiple tubes, making it more efficient for our ramp to slowly roll the user out of bed. Our next prototype of how we see it working is coming soon. Here is a diagram of what we are thinking.
 
Brainstorming why it is people "snooze" there alarms every morning. The reason we found most intriguing was the idea of the snooze button as a false sense of security for the users.


Here is a diagram of how we envision the binding of multiple tubes to look. The dark lines are where the bindings will overlap.


Here is a side view of the tubes in the foam piece on top of a mattress.


Sensors:


There are two directions we are thinking about going in for triggering the arduino to respond once a person is awake. One way is using the arduino itself as a timer/alarm so the person would set a time for the "alarm" or arduino to be triggered in the morning. Once it is the time that is set, the arduino would trigger a response to deflate the bed. The other way (we are leaning towards) is to use some other sensor to detect that a person is awake or that an alarm has gone off and then that would trigger the arduino and deflate the bed.


Some types of sensor possibilities for this (scenario 2):


Sensor to detect the sound of the alarm
Heart rate sensor


Other components for our design:
A pump (to deflate the vinyl tubes, and re-inflate them)
A relay
Valves? to seal the tubes once inflated
Power source (possibly 2)

Ryan & Dave - Gathering Components


The motor we bought off e-bay arrived today. We can start thinking about mounting. I'm impressed with how small it is, but we're going to have to think about heat. Maybe some fins.

750 Watts. Plenty of power


20 Amps peak load (at stall speed) and 2600 rpm @ 36 volts. since this has plenty of power, we might want to look into running this at 24 volts. At the moment, our plan is to reduce the rpm to the upper end of what's considered a decent cadence via some form of reduction. 1:20 final ratio would get us real close. The thought is that under load, we'd get some decent torque matched to a comfortable cadence.


I started to dig into my junk drawers to see what we might use - some nice belts.

A sprag clutch - a kind of roller bearing that spins in one direction but locks in the other. It seems like a perfect fit on the motor shaft but it's unlikely that it will be mounted directly. Most likely a spud shaft if there's not too much overhang or a second reduction. The reason for including a sprag clutch is to disengage the crank from the motor when the speed of the crank exceeds the output of the motor. Without it, the motor would be turned into a generator causing extra work for the cyclist.

A stoker crank for a tandem. this mounts on the left side of the crank. We plan on running power to here.

Hmmm. The width of the spider is conveniently close to the width of the belts. We might be able to use this somehow.