Monday, August 22, 2011
Tuesday, June 7, 2011
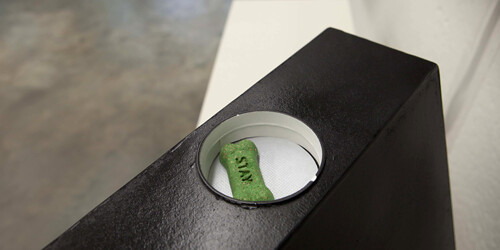
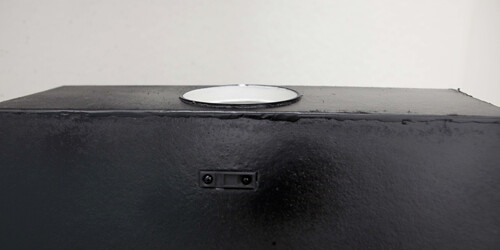
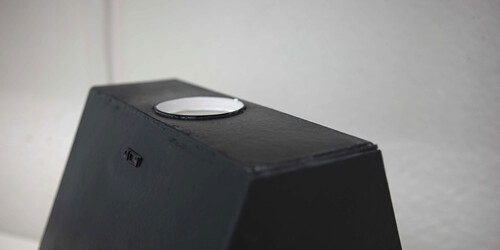
Night Owl: A Storytelling Buddy


A storytelling nighttime friend, Night Owl uses an arduino to run an audio clip of any story uploaded to it. Just turn him on, and he'll help your child fall back to sleep at night. If you're still awake while his voice starts to quiet and his belly LED lights dim, just shake him and he'll go back to reading the story.

What if instead of dancing to music, you could make music by dancing?
By building accelerometers into dancers' garments, we can capture the intensity of their movements and play music accordingly.
 Break Dancer Javon dances, activating the melody track, and then passes off the dance to Victor whos beat track then turns on.
Go-For-It: Cierra Gonzales / Chris Rinker
We all know what dinner is like with dogs around. They will get as close as they can or even underneath the dining room table, waiting for the chance to snatch a piece of fallen food. To solve this toe nibbling issue we came up with an idea similar to Wack-A-Mole, but for dogs.
The unit includes an elevator comprised of a two-jointed lever, servo motor and platform. The unit also includes a Sharp proximity sensor that senses approaching objects or people. A treat is to be placed on the platform of the elevator so that is visible. When the dog identifies the treat and goes after it, the sensor senses the dog’s approach and the servo motor activates, dropping the elevator so that the treat is out of reach. If the treat is good enough, it could keep the dog’s attention for a while.
Elevator Mario: Scott Lui / Katie Hendricks
Lets face it, elevators are a hub for awkward interactions. To create a fun experience in place of an uncomfortable situation, we designed the Mario Elevator Floor. Using 2 arduinos, buttons, LEDs, speakers, and the classic childhood game 'Super Mario,' we transformed an everyday elevator into a multiplayer interactive game.


http://youtu.be/FQFKeooHcKk
The Retracting Umbrella
We have created a polite umbrella. The edges are lined with sensors that, with the slightest touch, cause the umbrella to retract. This umbrella allows the user to easily navigate crowds without worry.
 Polite Contracted State:

Also available on YouTube: http://youtu.be/s5OuCI4DXvI
Natural Extended State:
 Polite Contracted State:
ARDUAAMY: Expressive Hoodie

ARDUAAMY (reminiscent of the inventors' names) is an "expressive hoodie" that contains a pressure sensor in the cuff of the hoodie and is connected to LED's that transmit different colors based off of the amount of pressure on the sensor.


tupAWARE
Emily + Mitch
ART387: Physical IxD
Instructor: Dominic Muren
tupAWARE is a smart food storage container that tracks the temperature and save time of a user's food selection, alerting them when their food is about to spoil or is already past it's acceptable save time.
Powered by Arduino and temperature sensors, once the user has made a selection tupAWARE assigns an average save time to the category of food and subtracts time when the container is left in warmer temperatures for more than an hour. Normally food silently expires in the fridge, tupAWARE allows users to effortlessly know when it’s still safe to eat (green), when the food will expire the next day (yellow), and when the food is past it’s acceptable save time (red).


ART387: Physical IxD
Instructor: Dominic Muren
tupAWARE is a smart food storage container that tracks the temperature and save time of a user's food selection, alerting them when their food is about to spoil or is already past it's acceptable save time.
tupAWARE from Mitch Johnson on Vimeo.
Powered by Arduino and temperature sensors, once the user has made a selection tupAWARE assigns an average save time to the category of food and subtracts time when the container is left in warmer temperatures for more than an hour. Normally food silently expires in the fridge, tupAWARE allows users to effortlessly know when it’s still safe to eat (green), when the food will expire the next day (yellow), and when the food is past it’s acceptable save time (red).


PB & A #5
Patrick, Ben, and Arduino: Project Wrap Up
With the source code for our project finalized about a week and a half ago and the literal schematic of hardware components and assembly completed shortly after, all that was left for us was to actually build our device and record it in use. After nine weeks of careful planning, about $300 worth of component purchases, over 120 feet of wiring, and nearly 60 hours of bread board assembly alone, we wound up with the physical guts of our smart table:
What we're looking at is a highly complex system of shift registers, FSR's, and LED outputs. The FSR's (hidden beneath the cylindrical columns shown above) constantly sense the weight of the pint in place, relaying differences in pressure as the pint is consumed to the attached Arduino. The Arduino interprets the sensor data and turns on LED indicators accordingly; when half a pint is consumed, a single LED is turned on, when a full pint has been consumed, two LED's are turned on. This process occurs constantly for each pint sensing station.
The largest column, in the middle of the table is the pitcher sensing station and the randomized pitcher purchaser selection initiator. When an empty pitcher is placed on the central column, a series of LED's turn off and on in a pattern resulting in something similar to a digital roulette. The LED's gradually slow down to a stop and one user is selected to purchase the next pitcher for the table.
After assembling the guts, the next step was to place the supporting table top structure. An enormous amount of time was spent in the school wood shop precisely cutting down various pieces of our device, ranging from weight supporting dowels, to table ends, to our peg board table top:
It was essential that we make sure the hardware of our device was functioning properly at every step of assembly. Here we are testing the light housings as we attach our peg board table top support:

In order to create the illusion of glowing pint glasses, we hand cut stencils and placed them between layers of thin, light diffusing paper, and thick, durable sheets of Yupo, a synthetic water resistant polymer:

The Yupo created an excellent water resistant layer that protected the internal components of our table from the inevitable spills sure to occur once our device was in action:
As a final test, before the protective layers of Yupo were attached to our top, we ran our device with pint glasses in place (successfully, first try!):
...and here is the final product:
With our device assembled, our code running perfectly, and our spirits high, it was time to test it in the field and film the results. Once we began, it wasn't long before we realized that our device was in all actuality, a wild success. As the afternoon progressed, our filming process became more of a documentation -- our actors became our users as they were thoroughly enjoying themselves while interacting with our device. It was clear to us that we were "on to something" with this project when a small crowd of bar patrons started to gather to watch us use our table! In fact, it became something of a nuisance as our filming was being constantly interrupted with questions, comments, and not so accidental walk-throughs.
The randomized selection of the person to buy the next round was by far the most successful aspect of our device. The reactions we got from our users justified the project entirely -- it was pure entertainment resulting from a social interaction enhanced through the use of our device.
This is the short film resulting from that experience:
...and a few shots of the device in action:


Again, the project was a wild success. It took an enormous effort to get to where we are today but we are very happy with the results. In fact, we're considering looking into getting a patent!
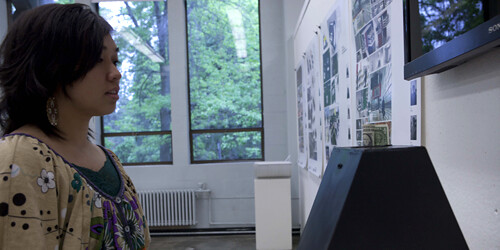
Fabricating Night Owl
Alana Robinson // Daniya Ulgen
We wanted to completely make him from scratch so we could form him to our specific necessities.
Here are a few of our shots from his fabrication.


Trying on glasses, we wanted to find a form that would give the wisest, most authoritative feel. Eventually we came on a square, black form for the glasses. His white belly allows for the light to show through and easily shows a fade.
Daniya and Alana
As our product is a children's toy, we want our video to have a kid like feel. Originally we thought we would use paper cut outs to create the foreground and background, having a very flat perspective. This is the first attempt at our story board for the video.


After waking up in the middle of the night, the child is frightened by invasive shadows around him/her. Glowing from the belly, the paper cut out Night Owl arrives to ease the child's fear and lulls the him/her back to a peaceful and calm sleep. Lighting would slowly fade out.
We decided to make a slightly more inclusive video, one that had actual footage of our product in it's environment. We kept some of the same ideas, such as using the shadows on the wall. Our Night Owl also took more of a superhero approach. With a cape over his shoulder, Night Owl will save the day, or night.
Boom!

What if instead of dancing to music, you could make music by dancing?
By building accelerometers into dancers' garments, we can capture the intensity of their movements and play music accordingly.

Here, two dancers perform using our product.
When Javon Freezes, his track stops playing, giving Victor a chance to solo. When they both dance, both tracks play in sync.
Monday, June 6, 2011
Final Project: Neil Rhoades & Inness Wragg

Pitch is a way to connect more full with a large social situation. Ideal for restaurants and bars with a social atmosphere, it connects tables across the airwaves through live audio feeds. When the vessel is poured, its direction is associated arbitrarily with a feed from another pitcher, and it receives ten seconds of live audio. Users will learn how top manipulate Pitch to explore different feeds. This will create a more involved atmosphere connecting people to those around them and amplifying the existing feelings of excitement in a crowd.
The introduction of Pitch into a social space provide a basis for conversation within a table, as well as making patrons more aware of what's going on around them, and of themselves.


Friday, June 3, 2011
Week 10
Amy & Amy
This week has been a week full of coding and making a permanent mount for the LEDs. We are still in the process of finalizing the code portion and our soldered breadboards with the LEDs are presumably not working.
For the next 5 days we will be finalizing the code portion and rebuilding another housing for the LED's, and shooting video, in hopes that we will have a working device.
Wednesday, June 1, 2011
Week 10: Neil & Inness

This weekend our team has been in and out of the wood-shop creating our base. We've completed our code and the electronic portion of our device, so that all we have to do is configure it in a way so it fits snugly into the base with a bit of padding.
We used yellow foam to form our base, trimming a block into a cylinder on the lathe and scooping out the interior with a drill press. We created a space for the speaker by drilling out a pattern of small holes from the interior to the exterior. We then painted and sanded to foam until it had a hard, smooth shell. We initially created a container with a lid to affix to the pitcher, but we used rare earth magnets to keep the container closed, which interfered with our compass sensor. Needing to change our strategy, we are now planning on flipping the container so the side that was at first the bottom will now be attached to the bottom of the pitcher. We will close the base by screwing in an acrylic circle with the same diameter as our base. With a bit more time in the woodshop and some drying time for adhesives, our prototype will be complete, and all we will need to do is make a video demonstration of the pitcher in action.
Tuesday, May 31, 2011
H2duinO
This past week has been exciting as we have made a significant amount of progress. Our code is now fully functional and our final bottle model is nearing completion. The transition from paper cups to a water bottle required a few slight code alterations, as the thicker plastic walls made the capacitive sensors less sensitive to changes in water level.
This video shows our code working on a paper cup. The LED is set to blink every 10 seconds if water is not consumed (it will probably be 1 hour in our final model). The LED turns off/timer resets if the water level goes down.


Subscribe to:
Posts (Atom)